

Please note this functionality is now built in to UberMenu 3, with the new Dynamic Content feature.
One thing the WordPress 3 Menu System lacks is the ability to dynamically insert/auto-populate content such as Categories. However, with UberMenu – Responsive WordPress Mega Menu Plugin you can use the menu’s Content Override / Shortcode capability to insert any content you want to into the menu.
One use case is the need to place several columns of categories, stacked top to bottom and then left to right. We could do this with the standard WordPress Menu System and UberMenu by creating third level menu items for each category. The main issue with this is ease of maintenance, which can become tedious when dealing with large numbers of menu items that may change frequently.
Our goal is to:
- create a shortcode that will dynamically generate several columns of categories
- automatically optimize the number of categories per column to keep them as level as possible
- make the shortcode flexible to be able to return specific terms from any taxonomy
The strategy will be to create a wrapper shortcode for the WordPress core get_terms() function, and then output the results in several lists, which we will turn into a column layout with some simple CSS.
Part 1: The Shortcode
Shortcode Skeleton
First, we’re going to define a shortcode, menu-terms, in our child theme’s functions.php, along with its accompanying function.
function ss_menu_terms( $atts ){

}
add_shortcode( 'menu-terms' , 'ss_menu_terms' );
The rest of the PHP will go inside the ss_menu_terms function, which will take the arguments passed to the shortcode and return the requested terms in the proper number of columns.
Define Arguments
Next we’re going to define the arguments for the shortcode, along with intelligent defaults, to minimize the amount of arguments that need to be passed to the shortcode. We’re going to define a few output-specific arguments, plus the arguments taken by the get_terms function, to make our shortcode as flexible as possible.
After that we’ll also convert our arguments into proper data types: strings into booleans and arrays.
	extract( shortcode_atts( array(
		'tax' 			=> 'category',
		'display_count'	=> 'false',
		'columns'		=> 5,

		'orderby'		=> 'name',
		'order'			=> 'ASC',
		'hide_empty'	=> 'false',
		'exclude'		=> array(),
		'exclude_tree'	=> array(),
		'include'		=> array(),
		'number'		=> '',
		//'fields'		=> 'all',
		'slug'			=> '',
		'parent'		=> '',
		'hierarchical'	=> 'true',
		'child_of'		=> 0,
		'get'			=> '',
		'name__like'	=> '',
		'pad_counts'	=> 'false',
		'offset'		=> '',
		'search'		=> '',
		'cache_domain'	=> 'core'
	), $atts ) );

	$display_count = $display_count == 'true' ? true : false;
	$hide_empty = $hide_empty == 'true' ? true : false;
	$hierarchical = $hierarchical == 'false' ? false : true;
	$pad_counts = $pad_counts == 'true' ? true : false;

	if( strpos( $tax , ',' ) ) $tax = explode( ',' , $tax );
	if( !is_array( $exclude ) ) $exclude = explode( ',' , $exclude );
	if( !is_array( $exclude_tree ) ) $exclude_tree = explode( ',' , $exclude_tree );
	if( !is_array( $include ) ) $include = explode( ',' , $include );
The tax argument will define our target taxonomy and allow the plugin to work categories, tags, or any custom taxonomy
The display_count argument will allow us to display a count of the number of posts associated with a term, if we choose.
The columns argument will define the number of columns to evenly divide the terms between.
The rest of the arguments are specific to the get_terms function, and are all defined here. Since we can’t pass arrays or booleans via a shortcode, we’ll use comma-delimited strings and boolean text strings instead.
Get the Terms
Now that we have all of our arguments, we’ll compress them into an array and pass them to the get_terms function to get our list of $term objects.
	$term_args = compact(
			'orderby' , 'order' , 'hide_empty' , 'exclude' ,
			'exclude_tree' , 'include' , 'number' , 'slug' ,
			'parent' , 'hierarchical' , 'child_of' , 'get' ,
			'name__like' ,  'pad_counts' , 'offset' ,
			'search' , 'cache_domain' );

	$terms = get_terms( $tax , $term_args );
Calculate Columns
Next, we figure out how many columns we need by dividing the number of total terms by the number of desired columns and rounding up.
$n = count( $terms );
$per_column = ceil( $n / $columns );
Now that we know how many terms per column we need, we just start a new list every $per_column items.
Output the terms
Finally, we loop through the terms, creating out lists and list items, and wrapping the term names in links to the term archive pages. We create an output string and return that, because shortcodes must always return their values and not print them directly.
$html = '<div class="menu-terms menu-terms-col-'.$columns.'">';

$html.= '<ul class="menu-terms-column">';

foreach( $terms as $i => $term ){
	$html.= '<li class="term-'.$term->term_id.' term-slug-'.$term->slug.' term-taxonomy-'.$term->taxonomy.'">';
	$html.= '<a href="'.get_term_link($term).'">';
	$html.= $term->name;
	if( $display_count ) $html.= ' ('.$term->count. ')';
	$html.= '</a></li>';

	if( ($i+1) % $per_column == 0 ){
		$html.= '</ul><ul class="menu-terms-column">';
	}
}

$html.= '</ul></div>';

return $html;
Our final shortcode definition looks like this:
function ss_menu_terms( $atts ){

	extract( shortcode_atts( array(
		'tax' 			=> 'category',
		'display_count'	=> 'false',
		'columns'		=> 5,

		'orderby'		=> 'name',
		'order'			=> 'ASC',
		'hide_empty'	=> 'false',
		'exclude'		=> array(),
		'exclude_tree'	=> array(),
		'include'		=> array(),
		'number'		=> '',
		//'fields'		=> 'all',
		'slug'			=> '',
		'parent'		=> '',
		'hierarchical'	=> 'true',
		'child_of'		=> 0,
		'get'			=> '',
		'name__like'	=> '',
		'pad_counts'	=> 'false',
		'offset'		=> '',
		'search'		=> '',
		'cache_domain'	=> 'core'
	), $atts ) );

	$display_count = $display_count == 'true' ? true : false;
	$hide_empty = $hide_empty == 'true' ? true : false;
	$hierarchical = $hierarchical == 'false' ? false : true;
	$pad_counts = $pad_counts == 'true' ? true : false;

	if( strpos( $tax , ',' ) ) $tax = explode( ',' , $tax );
	if( !is_array( $exclude ) ) $exclude = explode( ',' , $exclude );
	if( !is_array( $exclude_tree ) ) $exclude_tree = explode( ',' , $exclude_tree );
	if( !is_array( $include ) ) $include = explode( ',' , $include );

	$term_args = compact(
			'orderby' , 'order' , 'hide_empty' , 'exclude' ,
			'exclude_tree' , 'include' , 'number' , 'slug' ,
			'parent' , 'hierarchical' , 'child_of' , 'get' ,
			'name__like' ,  'pad_counts' , 'offset' ,
			'search' , 'cache_domain' );

	$terms = get_terms( $tax , $term_args );

	$n = count( $terms );
	$per_column = ceil( $n / $columns );

	$html = '<div class="menu-terms menu-terms-col-'.$columns.'">';

	$html.= '<ul class="menu-terms-column">';

	foreach( $terms as $i => $term ){
		$html.= '<li class="term-'.$term->term_id.' term-slug-'.$term->slug.' term-taxonomy-'.$term->taxonomy.'">';
		$html.= '<a href="'.get_term_link($term).'">';
		$html.= $term->name;
		if( $display_count ) $html.= ' ('.$term->count. ')';
		$html.= '</a></li>';

		if( ($i+1) % $per_column == 0 ){
			$html.= '</ul><ul class="menu-terms-column">';
		}
	}

	$html.= '</ul></div>';

	return $html;
}
add_shortcode( 'menu-terms' , 'ss_menu_terms' );
Part 2: The CSS
Now we have our markup – by default, 5 lists with the terms evenly distributed among them. But right now they’re just unstyled lists. Adding CSS will turn them into the columns we want.
First, we’re going to define a class, menu-terms-item which we will add to our menu item to ensure it takes up the whole with of the submenu; otherwise our percentage-based columns won’t spread out properly.
#megaMenu ul.megaMenu .menu-terms-item{
	width:100%;
	-webkit-box-sizing:border-box;
	-mox-box-sizing:border-box;
	-o-box-sizing:border-box;
	box-sizing:border-box;
}
Next, we’ll define the layout of the columns themselves, as well as a simple grid to define the percentage widths of the columns from 1 to 8.
#megaMenu ul.megaMenu .menu-terms{
	margin-top:10px;
}
#megaMenu ul.megaMenu .menu-terms a{
	text-decoration: none;
}
#megaMenu ul.megaMenu .menu-terms ul.menu-terms-column{
	-webkit-box-sizing:border-box;
	-mox-box-sizing:border-box;
	-o-box-sizing:border-box;
	box-sizing:border-box;
	float:left;
	margin:0;
	padding-right:20px;
	margin-bottom:20px;
	list-style:none;
}
#megaMenu ul.megaMenu .menu-terms.menu-terms-col-1 ul.menu-terms-column{ width: 100%; }
#megaMenu ul.megaMenu .menu-terms.menu-terms-col-2 ul.menu-terms-column{ width: 50%; }
#megaMenu ul.megaMenu .menu-terms.menu-terms-col-3 ul.menu-terms-column{ width: 33%; }
#megaMenu ul.megaMenu .menu-terms.menu-terms-col-4 ul.menu-terms-column{ width: 25%; }
#megaMenu ul.megaMenu .menu-terms.menu-terms-col-5 ul.menu-terms-column{ width: 20%; }
#megaMenu ul.megaMenu .menu-terms.menu-terms-col-6 ul.menu-terms-column{ width: 16%; }
#megaMenu ul.megaMenu .menu-terms.menu-terms-col-7 ul.menu-terms-column{ width: 14%; }
#megaMenu ul.megaMenu .menu-terms.menu-terms-col-8 ul.menu-terms-column{ width: 12%; }
Finally, below 768 pixels we will collapse the terms into two columns, and below 480px we will collapse them into a single column:
@media only screen and (max-width:767px) {
	#megaMenu ul.megaMenu .menu-terms-item{ width:100% !important; }
	#megaMenu ul.megaMenu .menu-terms.menu-terms-col-1 ul.menu-terms-column,
	#megaMenu ul.megaMenu .menu-terms.menu-terms-col-2 ul.menu-terms-column,
	#megaMenu ul.megaMenu .menu-terms.menu-terms-col-3 ul.menu-terms-column,
	#megaMenu ul.megaMenu .menu-terms.menu-terms-col-4 ul.menu-terms-column,
	#megaMenu ul.megaMenu .menu-terms.menu-terms-col-5 ul.menu-terms-column,
	#megaMenu ul.megaMenu .menu-terms.menu-terms-col-6 ul.menu-terms-column,
	#megaMenu ul.megaMenu .menu-terms.menu-terms-col-7 ul.menu-terms-column,
	#megaMenu ul.megaMenu .menu-terms.menu-terms-col-8 ul.menu-terms-column{ width: 50%; }
}
@media only screen and (max-width:479px) {
	#megaMenu ul.megaMenu .menu-terms.menu-terms-col-1 ul.menu-terms-column,
	#megaMenu ul.megaMenu .menu-terms.menu-terms-col-2 ul.menu-terms-column,
	#megaMenu ul.megaMenu .menu-terms.menu-terms-col-3 ul.menu-terms-column,
	#megaMenu ul.megaMenu .menu-terms.menu-terms-col-4 ul.menu-terms-column,
	#megaMenu ul.megaMenu .menu-terms.menu-terms-col-5 ul.menu-terms-column,
	#megaMenu ul.megaMenu .menu-terms.menu-terms-col-6 ul.menu-terms-column,
	#megaMenu ul.megaMenu .menu-terms.menu-terms-col-7 ul.menu-terms-column,
	#megaMenu ul.megaMenu .menu-terms.menu-terms-col-8 ul.menu-terms-column{ width: 100%; }
}
See also Adding Custom CSS
Part 3: Adding the Shortcode to the menu
Now that we have all our code in place, we’ll add it to our menu. The intention is to auto-populate a full row of leveled columns with a single menu item / shortcode.
First, make sure you have Content Overrides Enabled
Next, create a new second level menu item. I recommend using a “Link” menu item and setting the URL to # and checking the “Disable Link” option. However, you can use any type you like.
If you don’t want to display the link’s Navigation Title above the columns of categories, check the “Disable Text” option.
Next, add the menu-terms-item class to your menu item
Finally, insert the shortcode itself into the Custom Content box.
[menu-terms]

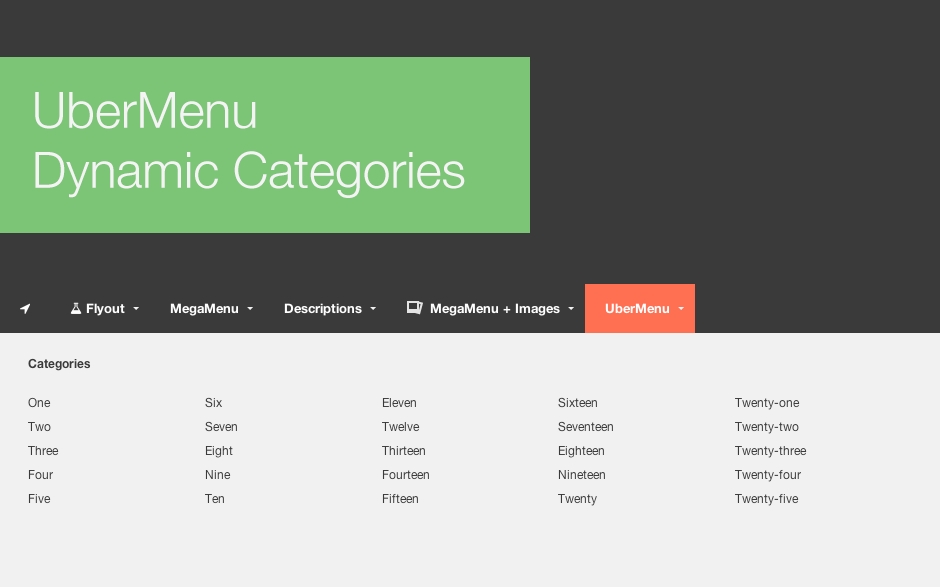
Here’s the result:

The categories are sorted alphabetically by default.
Part 4: Using the shortcode arguments
We can refine the terms returned and their layout by passing arguments to the shortcode. Here are some examples:
Columns
By default, 5 columns to be displayed. To display 6, we would use
[menu-terms columns="6"]
Sorting
By default, the terms will be ordered alphabetically. To order them by ID, you would use
[menu-terms orderby="id"]
Hierarchies
With no arguments passed, the shortcode will return all terms in the taxonomy (by default, this means all Categories). If we want to restrict the set to children of a specific menu item, we can do this:
[menu-terms child_of="5"]
Where 5 is the ID of the parent item.
Different taxonomies
If you have a custom taxonomy you want to display, you can pass the tax argument.
[menu-terms tax="product-categories"]
For example, maybe you have a product categories taxonomy for an e-commerce site, and you have subcategories under “Men’s”, “Women’s”, etc. If your “Men’s” term ID is 10 and your “Women’s” term ID is 20, you could display their subcategories in two different submenus using these two different instances of the shortcode:
[menu-terms tax="product-categories" child_of="10"]
[menu-terms tax="product-categories" child_of="20"]
The first would display only Men’s categories, and the second only Women’s
Exclude items
If you want to exclude specific items, you can do so by ID. List multiple IDs in a comma-separated string
[menu-terms exclude="15,20,76"]
The full set of get_terms parameters and what they do can be found in the WordPress Codex.
