
Overview
To build a multi-level mega menu structure of automatically generated terms, you can “nest” the [Dynamic Terms] items – that is, create multiple levels of parent/child relationships where the items inherit from one another.
This tutorial walks you through setting up a menu with two submenu levels that automatically mirror a taxonomy structure.
We’ll use this menu structure:
To create this display:
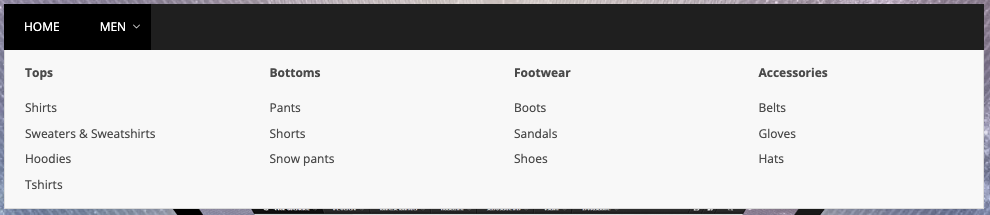
The parent [Dynamic Terms] item creates the second level column headers (Tops, Bottoms, Footwear, Accessories), while the child [Dynamic Terms] item creates the content below each header.
Key Concepts
1. A [Dynamic Terms] item creates one menu level
First, it’s important to understand that each [Dynamic Terms] item creates one level in the menu structure hierarchy, dictated by the position of the [Dynamic Terms] item in Appearance > Menus.
You can think of this as the results of the [Dynamic Terms] query expanding to replace that item in your menu structure.
In other words, this structure:
- Top Level
- - [Dynamic Terms]
will generate this:
- Top Level
- - Term A
- - Term B
- - Term C
It will *not* generate a third level, even if your Terms query returns multiple levels of terms items. To do that, we would use nesting:
- Top Level
- - [Dynamic Terms] (set parent term)
- - - [Dynamic Terms] (inherit parent term)
which will generate this when properly configured:
- Top Level
- - Term A
- - - Term A1
- - - Term A2
- - Term B
- - - Term B1
- - - Term B2
- - Term C
- - - Term C1
- - - Term C2
All terms returned by a [Dynamic Terms] query will be treated as a single level in the menu hierarchy. Therefore, when configuring [Dynamic Terms], we want each one to return a single level of the taxonomy. If your [Dynamic Terms] item returns multiple levels of the taxonomy hierarchy, those terms will be flattened into a single level of the menu.
2. Displaying a single level of the taxonomy per [Dynamic Terms] item
A generic terms query in a specific taxonomy would return all terms.
When we nest [Dynamic Terms] items, we want each item to return one level of the taxonomy. For example, the first [Dynamic Terms] item should likely only return the top level items in the taxonomy.
The Parent Term setting allows you to filter the [Dynamic Terms] query results to children of a single term.
To show only top level terms, select [Top Level Terms Only], or set the ID to 0.

3. Inheriting the parent item dynamically
The Parent Term setting can be set to dynamically inherit the term of the parent item. This is how we nest Dynamic Terms.
If we have this structure:
- Top Level
- - [Dynamic Terms 1]
- - - [Dynamic Terms 2]
We can set the second Dynamic Terms item’s Parent Term setting to “Automatic: Inherit Parent”, which means that for each term result in Dynamic Terms 1, only child terms of that item will be generated in the menu structure.
Nested Dynamic Terms Example
Here we’ll walk though an example step by step.
Scenario
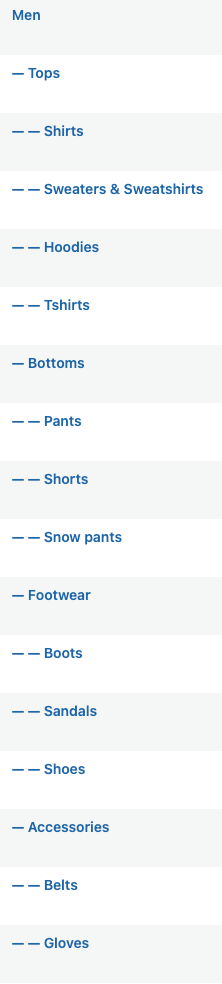
Let’s say we have an e-commerce store. We want to have a top level menu item “Men”, that displays 2 levels of product categories in the submenu.
Our Product Categories taxonomy structure looks like this:

We want to dynamically generate the two descendant levels of “Men” in our menu to create this structure:
- Men
- - Tops
- - - Shirts
- - - Sweaters & Sweatshirts
- - - ...
- - Bottoms
- - - Snow Pants
- - - Shorts
- - - ...
- - Accessories
- - - Belts
- - - Gloves
- - - Hats
- - Footwear
- - - Boots
- - - Shoes
- - - Sandals
The second level items will be column headers, and the third level items will stack vertically within those columns.
Building the menu
Let’s start with a basic menu structure.
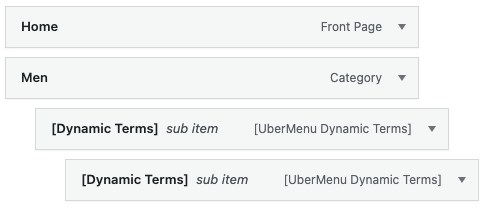
We have a top level Category item (“Men”) and have added a [Dynamic Terms] item as a child.

Configuring the parent [Dynamic Terms] item
In the UberMenu settings for the [Dynamic Terms] item, we’ll configure our terms query.
Taxonomy
We want to show product categories from our store, so we select Product categories as the Taxonomy.

Layout Columns
We also know we have 4 second level terms that should be the headers of 4 columns, so we’ll set the Layout > Columns Width for the [Dynamic Terms] to 1/4

If we save and take a look at what we’ve got so far, we’ll see this:

We’ve returned *all* the Product Category terms in the taxonomy, and displayed them all as second level items in 4 columns.
We want to adjust the filter to only return children of the “Men” term for this [Dynamic Terms] item.
Filtering by Parent
Because the parent menu item of our [Dynamic Terms] item is a Category item, we can set the Parent Term setting to Automatic: Inherit Parent, and the terms query will automatically pick up the “Men” term as the parent.

Note that we could also select a specific parent term explicitly (if the parent menu item were not a term item), or choose the [Top Level Terms Only] option if you wanted to display all top level terms within this taxonomy.
Now if we save and refresh, we’ll see only the child terms of “Men” appear in the submenu:

The next step is to add a child [Dynamic Terms] item to generate the second level of the submenu.
Configuring the child [Dynamic Terms] item
Adding the nested item
Next we’ll add a second [Dynamic Terms] item as a child of the first.
Don’t forget that after adding a new menu item, you need to save the entire menu for it to appear in on the front end at all.
Configuring to show only the proper child terms
We want to configure this [Dynamic Terms] item to show children of each result from the parent [Dynamic Terms] item.
Set the Taxonomy to Product categories again.
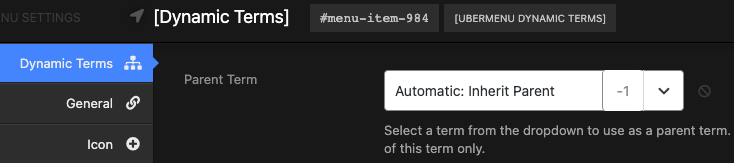
Now we’ll set the Parent Term to Automatic: Inherit Parent
Note: if you don’t set this setting, you’re not connecting this query to the parent query, so you’d end up with all terms nested below each of the second level items – not what we want.
If you save and refresh now, you’ll see the third level items appear:
Sorting
By default, the Dynamic Terms items are set up to return the terms in alphabetical order (by Term Name). This can be changed by changing the Sort by setting.
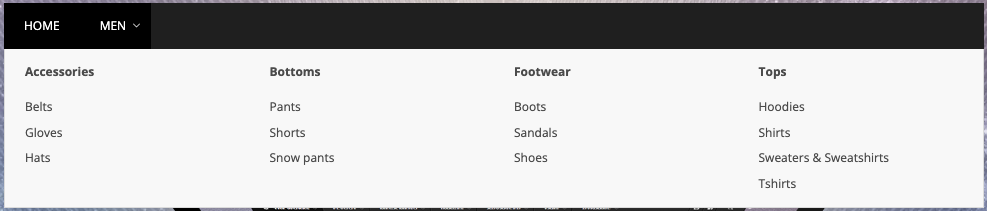
If you are using WooCommerce Product Categories, you will likely want to use the Meta – Order option. This will return the terms in the order you organize the terms in the Product Categories taxonomy screen.
For example, if we set the sort to the Meta Order

and then reorganize our second level categories to Tops, Bottoms, Footwear, Accessories
the menu will then reflect that order as well:
Note that you would need to do this on both [Dynamic Terms] items if you want them both to reflect the category order.
Additional Levels
You can continue to nest levels in this manner, inheriting the parent term for each new level. That said, 2 levels is generally the common limit for nesting levels of dynamic terms.
If you need more levels, consider using [Tabs] to add an additional dimension to your submenu. You could also consider indenting your submenus within stacks.
UX Considerations
Be sure to consider UX as well. Don’t overload your menu and overwhelm your visitors. Usually 3, and a max of 4 logical levels in a menu makes sense. If your site has further levels, consider using secondary navigation menus within the different sections of your site to allow visitors to drill down further. An accordion menu like Bellows is one way to create a secondary menu in a sidebar.
Performance Considerations
It’s important not to overdo it! Keep in mind that the nature of dynamic items means running a query to generate the menu items. If each level returns 5 terms, then for one level you run 1 query. For 2 levels you run 6 queries (1 + 51). For 3 levels you run 31 queries (1+51+52). This becomes an expensive operation quickly once you start to nest more than 2 levels. Make sure you are setting up your caching appropriately to make this as efficient as possible (see Database and Processing Optimization).